Overview
My gaming rig died. Gaming rigs can be expensive ($1000-$4000 on average, depending on how much you’re willing to spend). So I spun up a GPU instance on AWS to test how Doom 2016 played as a proof of concept. After the first 5-10 minutes of letting the hard drive warm up, it was buttery smooth. This lead me to investigate the overall costs for using AWS for my PC gaming rather than buying a new rig.
After doing the math, I opted to go the AWS gaming route. It’s not as staightforward as booting up a normal gaming rig. And the actual cost can vary wildly depending on how much time I spend gaming. But for my casual gaming purposes (under 20 hours of PC gaming per month), it fits my needs perfectly fine for a fraction of the cost.
AWS Gaming Rig Cost Estimates
Here are the numbers. All calculations were done using pricing on 2020-03-20 for us-west-2b. I use g4dn.xlarge for my gaming and it runs perfectly fine for my tastes, but for those who want more power on their rigs, I provide the numbers below for the more powerful g4dn offerings.
| Type | CPUs | RAM (GB) | GPUs | SSD (GB) | on demand/hr | spot/hr | 20 hr spot/mo/yr |
|---|---|---|---|---|---|---|---|
| g4dn.xlarge | 4 | 16 | 1 | 125 | $0.5260 | $0.1704 | $40.896 |
| g4dn.2xlarge | 8 | 32 | 1 | 225 | $0.7520 | $0.2378 | $57.072 |
| g4dn.4xlarge | 16 | 64 | 1 | 225 | $1.2040 | $0.3612 | $86.688 |
| g4dn.8xlarge | 32 | 128 | 1 | 1x900 | $2.1760 | $0.6528 | $156.672 |
| g4dn.16xlarge | 64 | 256 | 1 | 1x900 | $4.3520 | $1.3056 | $313.344 |
* Source: AWS Console Spot Price History for us-west-2b on 2020-03-20. Yearly calculations were done with an estimate of 20 hours of gaming per month throughout a year.
| Item | Price |
|---|---|
| General Purpose SSD (gp2) Volumes | $0.10 per GB-month of provisioned storage |
| EBS Snapshots | $0.05 per GB-month of data stored |
| 150 GB EBS Snapshots / mo | $7.50 |
| 150 GB EBS gp2 Volume for entire month | $15.00 |
| 150 GB EBS gp2 Volume for 20 hours / mo | ($15.00 / 730) * 20 = $0.41 |
| Total storage cost for 20 hours usage / mo | $7.91 / month |
| Total storage cost for 20 hours usage / mo / yr | $94.92 / year |
* Sources: https://aws.amazon.com/ebs/pricing/ and https://calculator.s3.amazonaws.com/
| Item | EBS | EC2 instance | Total/year |
|---|---|---|---|
| g4dn.xlarge + EBS costs | $94.92 | $40.896 | $135.816 |
| g4dn.2xlarge + EBS costs | $94.92 | $57.072 | $151.992 |
| g4dn.4xlarge + EBS costs | $94.92 | $86.688 | $181.608 |
| g4dn.8xlarge + EBS costs | $94.92 | $156.672 | $251.592 |
| g4dn.16xlarge + EBS costs | $94.92 | $313.344 | $408.264 |
One really important thing to note is that while the average spot price might be a certain amount, if you set your max spot price threshold to be the on-demand price, you will likely end up paying more than the average spot price. For example, I used this approach and my spend was twice the average spot price according to the following screen:
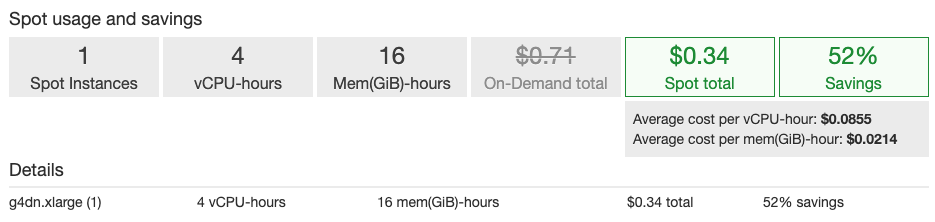
With that said, even if I paid double for the instance, that would still only come out to about $80 per year rather than $40 (plus EBS costs), which is a negligible difference compared to the price of a decent gaming rig.
How to make a new image
AMI and instance settings
- NVIDIA Gaming - Windows Server 2019 (https://aws.amazon.com/marketplace/pp/B07STLTHM8)
- g4dn.xlarge (or something bigger. treat yo self.)
- enough hard drive space to fit the OS + games + a little extra padding
Configuration script
I use Windows for my gaming rig and I run this Powershell code to prepare certain parts of the system.
# Clean up desktop.
cd ~/Desktop
rm *

# Create disconnect script on Desktop. This is used to leave the login session
# active, while disconnecting from the screen. When you use this script, the
# RDP client will likely throw an error, but your session should still be
# active on the EC2 instance.
$dcData = @"
`$sid = (Get-Process -PID `$pid).SessionID
tscon `$sid /dest:console
"@
$dcData | Out-File -FilePath ~/Desktop/dc.ps1 -Encoding ASCII

# Enable audio services.
Get-Service | Where {$_.Name -match "audio"} | Start-Service
Get-Service | Where {$_.Name -match "audio"} | Set-Service -StartupType "Automatic"

# Set up chocolatey.
Set-ExecutionPolicy Bypass -Scope Process -Force
iex ((New-Object System.Net.WebClient).DownloadString('https://chocolatey.org/install.ps1'))

# Install Steam.
choco install steam -yes

# Install autologon.
# https://docs.microsoft.com/en-us/sysinternals/downloads/autologon
choco install autologon -yes

# Set new Windows password.
$Password = Read-Host "Enter the new password" -AsSecureString
$UserAccount = Get-LocalUser -Name "Administrator"
$UserAccount | Set-LocalUser -Password $Password

# Run autologon.
AutoLogon.exe

# Log into Steam.
& 'C:\Program Files (x86)\Steam\Steam.exe'
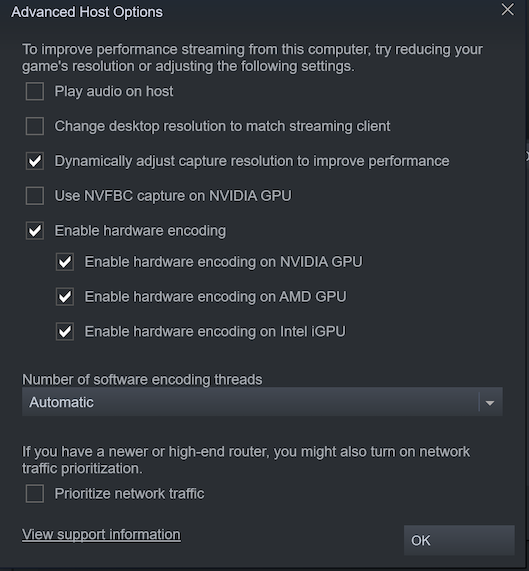
Configure steam’s host stream settings
This makes it so that graphics run smoothly during streaming. Graphics will be a bit choppy for the first few minutes after you spin up a new instance, but it should even out shortly after that.
Steam -> Settings -> Remote Play -> Advanced Host Options
Enable Steam Beta (optional)
I don’t know if this makes things better or worse, but a few sources online said that the beta tends to have some benefits over the stable client. I haven’t done extensive testing either way. The beta seems to work for me. Your mileage may vary.
Steam Menu -> Settings -> Beta Participation -> Change

Disable friends list (optional)
I don’t plan on chatting with friends on a gaming rig that’s costing me by the hour.
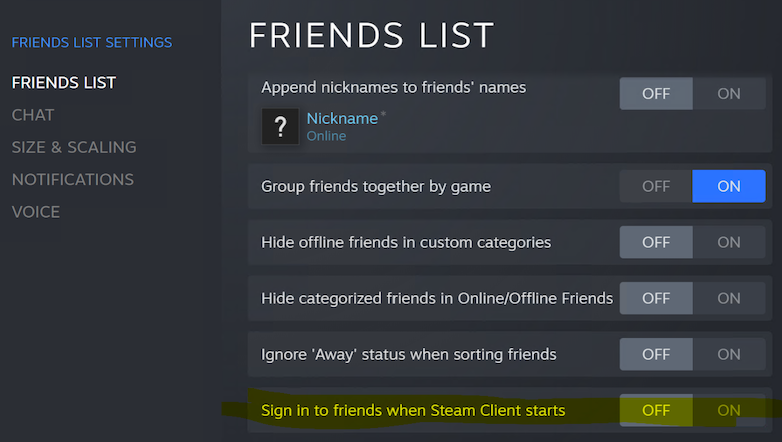
forever alone dot jay peg
Install games
Whatever games you want.
Launch at least one game and install required drivers
The next step is to make sure the games are playable without dealing with driver/software installation issues.
- Launch every game you installed. This may result in an attempt to automatically install some drivers or additional software, such as the .NET Framework.
- Reboot the system from the OS level as opposed to restarting from the AWS console.
- Wait up to 10 minutes to verify that both the account got logged onto and that Steam
autostarted (this is a default setting of Steam). Alternatively, you can log in and make sure
Steam starts. Then you can use the disconnect script that you created using the code shown above
for
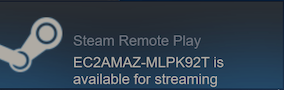
dc.ps1. This will make it so the system stays logged into the Desktop UI while your RDP session is disconnected. - After you have successfully logged into Steam on the AWS system, you should see a
notification on your local system (assuming you’re logged into Steam on another system) that
indicates the AWS system is ready for streaming.
- Try to launch a game from your streaming client now that a reboot has occurred and make sure the audio works over the stream. This is important to do since for some reason, some games work for me the first time prior to a reboot, but then won’t work unless I’ve enabled the audio service (see script above).
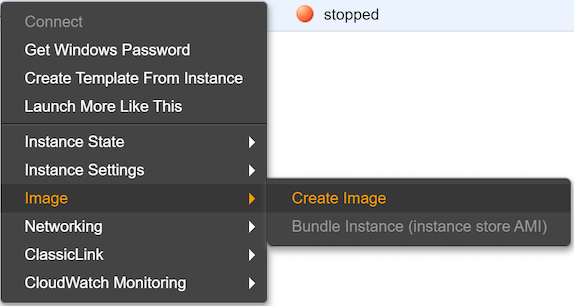
Shut down and make an image
Shut down the system from the OS (not the AWS console) and make an AMI based off the stopped
instance. This will take upwards of 30-60 minutes to create depending on how much hard drive space
you used when installing games. I prepend my snapshots with gaming- so I can use Terraform to
find them and add them to launch templates.
Deployment
I made a Terraform module to launch the instances. It is composed of two files: gaming.tf and variables.tf. Here is the code combined into one snippet:
data "aws_ami" "gaming" {
  most_recent = true
  owners      = ["self"]

  filter {
    name   = "name"
    values = ["gaming-*"]
  }
}

# I intentionally do not set the spot_price value because it defaults to the
# on-demand price. Based on my experience, this means I'm paying more than the
# average spot price. However, unless spot prices increase beyond the on-demand
# price, this will always be fulfilled.
resource "aws_spot_instance_request" "gaming" {
  ami           = data.aws_ami.gaming.id
  ebs_optimized = "false"
  instance_type = "g4dn.xlarge"
  key_name      = "primary"
  subnet_id     = var.subnet_id

  # Wait until the spot request is fulfilled. This should be fairly quick, so
  # if it takes a long time (minutes), then it should indicate a potential spot
  # instance shortage.
  wait_for_fulfillment = true

  # This allows me to take a snapshot of the instance and delete the
  # provisioned volume.
  instance_initiated_shutdown_behavior = "stop"

  # Do not request another instance fulfilment after this instance is
  # terminated.
  spot_type = "one-time"

  vpc_security_group_ids = [
    var.gaming_sg_id,
    var.egress_sg_id,
  ]

  tags = {
    Name = "gaming"
  }
}

resource "aws_eip_association" "gaming_eip_allocation_id" {
  instance_id   = aws_spot_instance_request.gaming.spot_instance_id
  allocation_id = var.gaming_eip_allocation_id
}

variable "subnet_id" {
  type = string
}

variable "gaming_sg_id" {
  type = string
}

variable "egress_sg_id" {
  type = string
}

variable "gaming_eip_allocation_id" {
  type = string
}
Enjoy!